Introduction

A lot of smartphone brands are developing this projector feature nowadays, because a lot of people love to see the product available for a convenience presentation and entertainment.
Since this feature is in high demand now, it cost us a lot to buy another extension of the product that is way too expensive, especially when it comes to branded kind of smartphone.
But now you can ignore those extra items and cash! In less than an hour, you can build your own DIY projector by adding your daily items and a little sum of bucks. In this tutorial you will learn step by step on how create in and now you can enjoy watching video while laying on the bed or do a simple presentation in the class or at your work.
Task
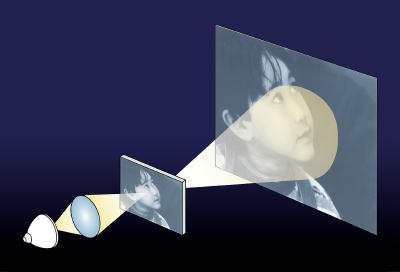
The idea to turn your smartphone into projector is basically to magnify watch you see in the phone screen and project it into bigger flat surface, like wall. Therefore you need to prepare three main items, which are magnifying glass as the projector lens, box like shoebox to conceal the smartphone from the light that will disturb the projection process, and the smartphone itself.
For the tools, you need pencil to trace the hole for the lens and cutter to cut it. And to seal the lens with the box, you’ll need black duck tape and scissors. Avoid using glue since it will be hard to disassemble them, in case you need to reuse the magnifying glass and it is recommended to use black colored tape or at least the one with dark color to prevent any light to go in and out.
Last is the phone stand. Small and stable one is preferable, but if you don’t have one, you can create a simple stand just by using a paper clip. The process will be explained later in the next part.
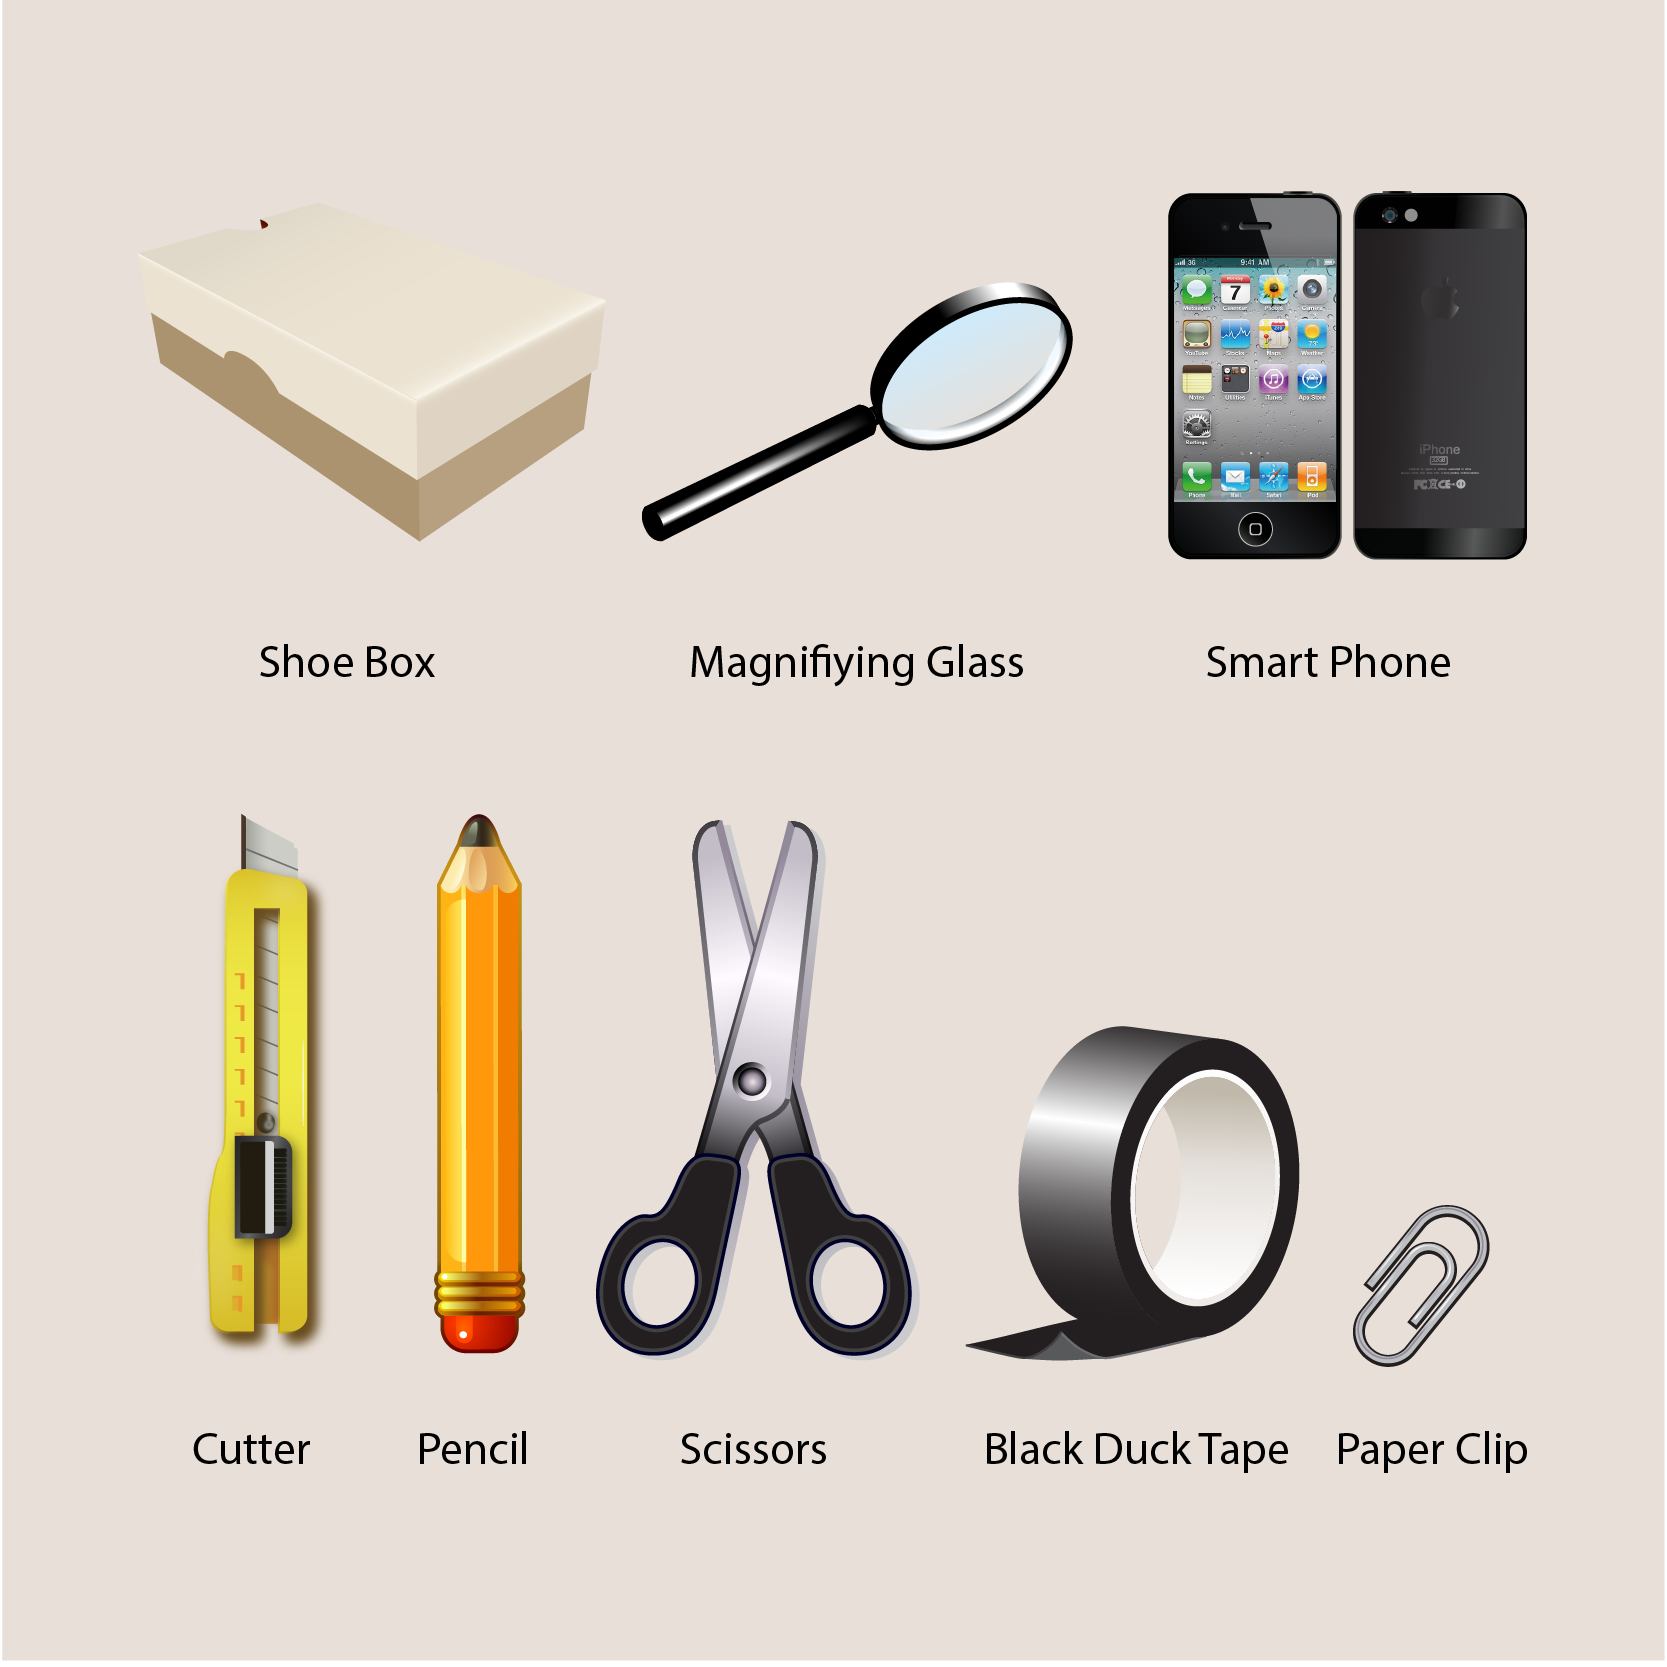
The process is pretty simple, just do everything neatly and you’ll get yourself a nice finishing. Kindly refer to the picture for the listed items that we need.
Process
1. Creating the Hole for The Lens
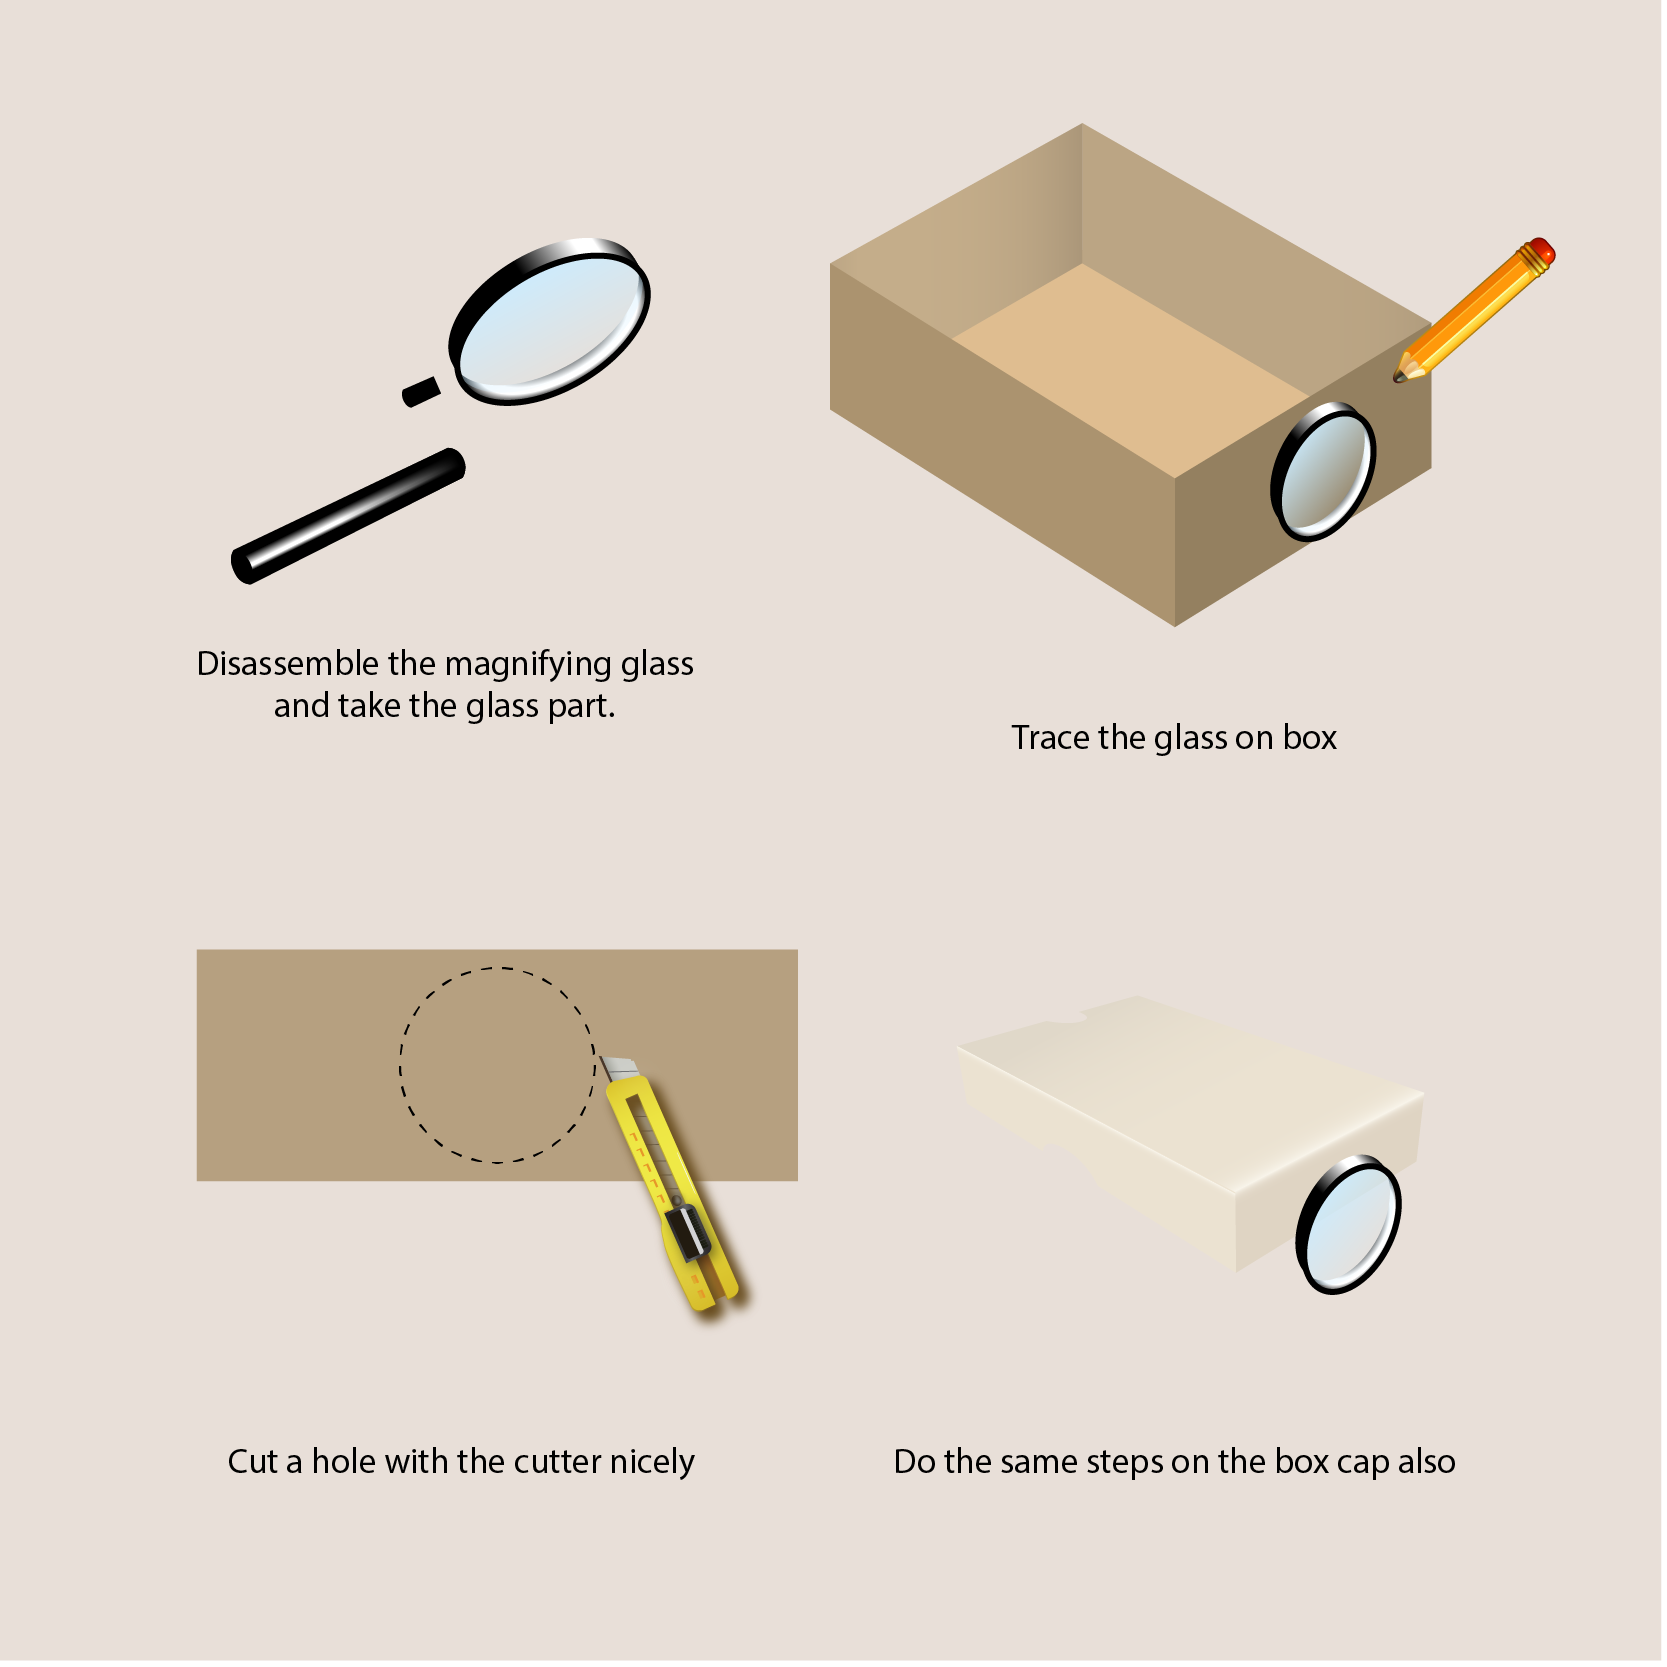
This is the first and the most crucial part, do it slow, take your time and make it very precise.
Disassemble the magnifying glass and take the glass. If possible keep the glass frame intact.
Open the shoebox and trace the glass on the small side of the box with pencil like what is shown in the picture then carefully cut the hole with cutter.
Do the same steps for the box cap.
2. Sealing the Lens
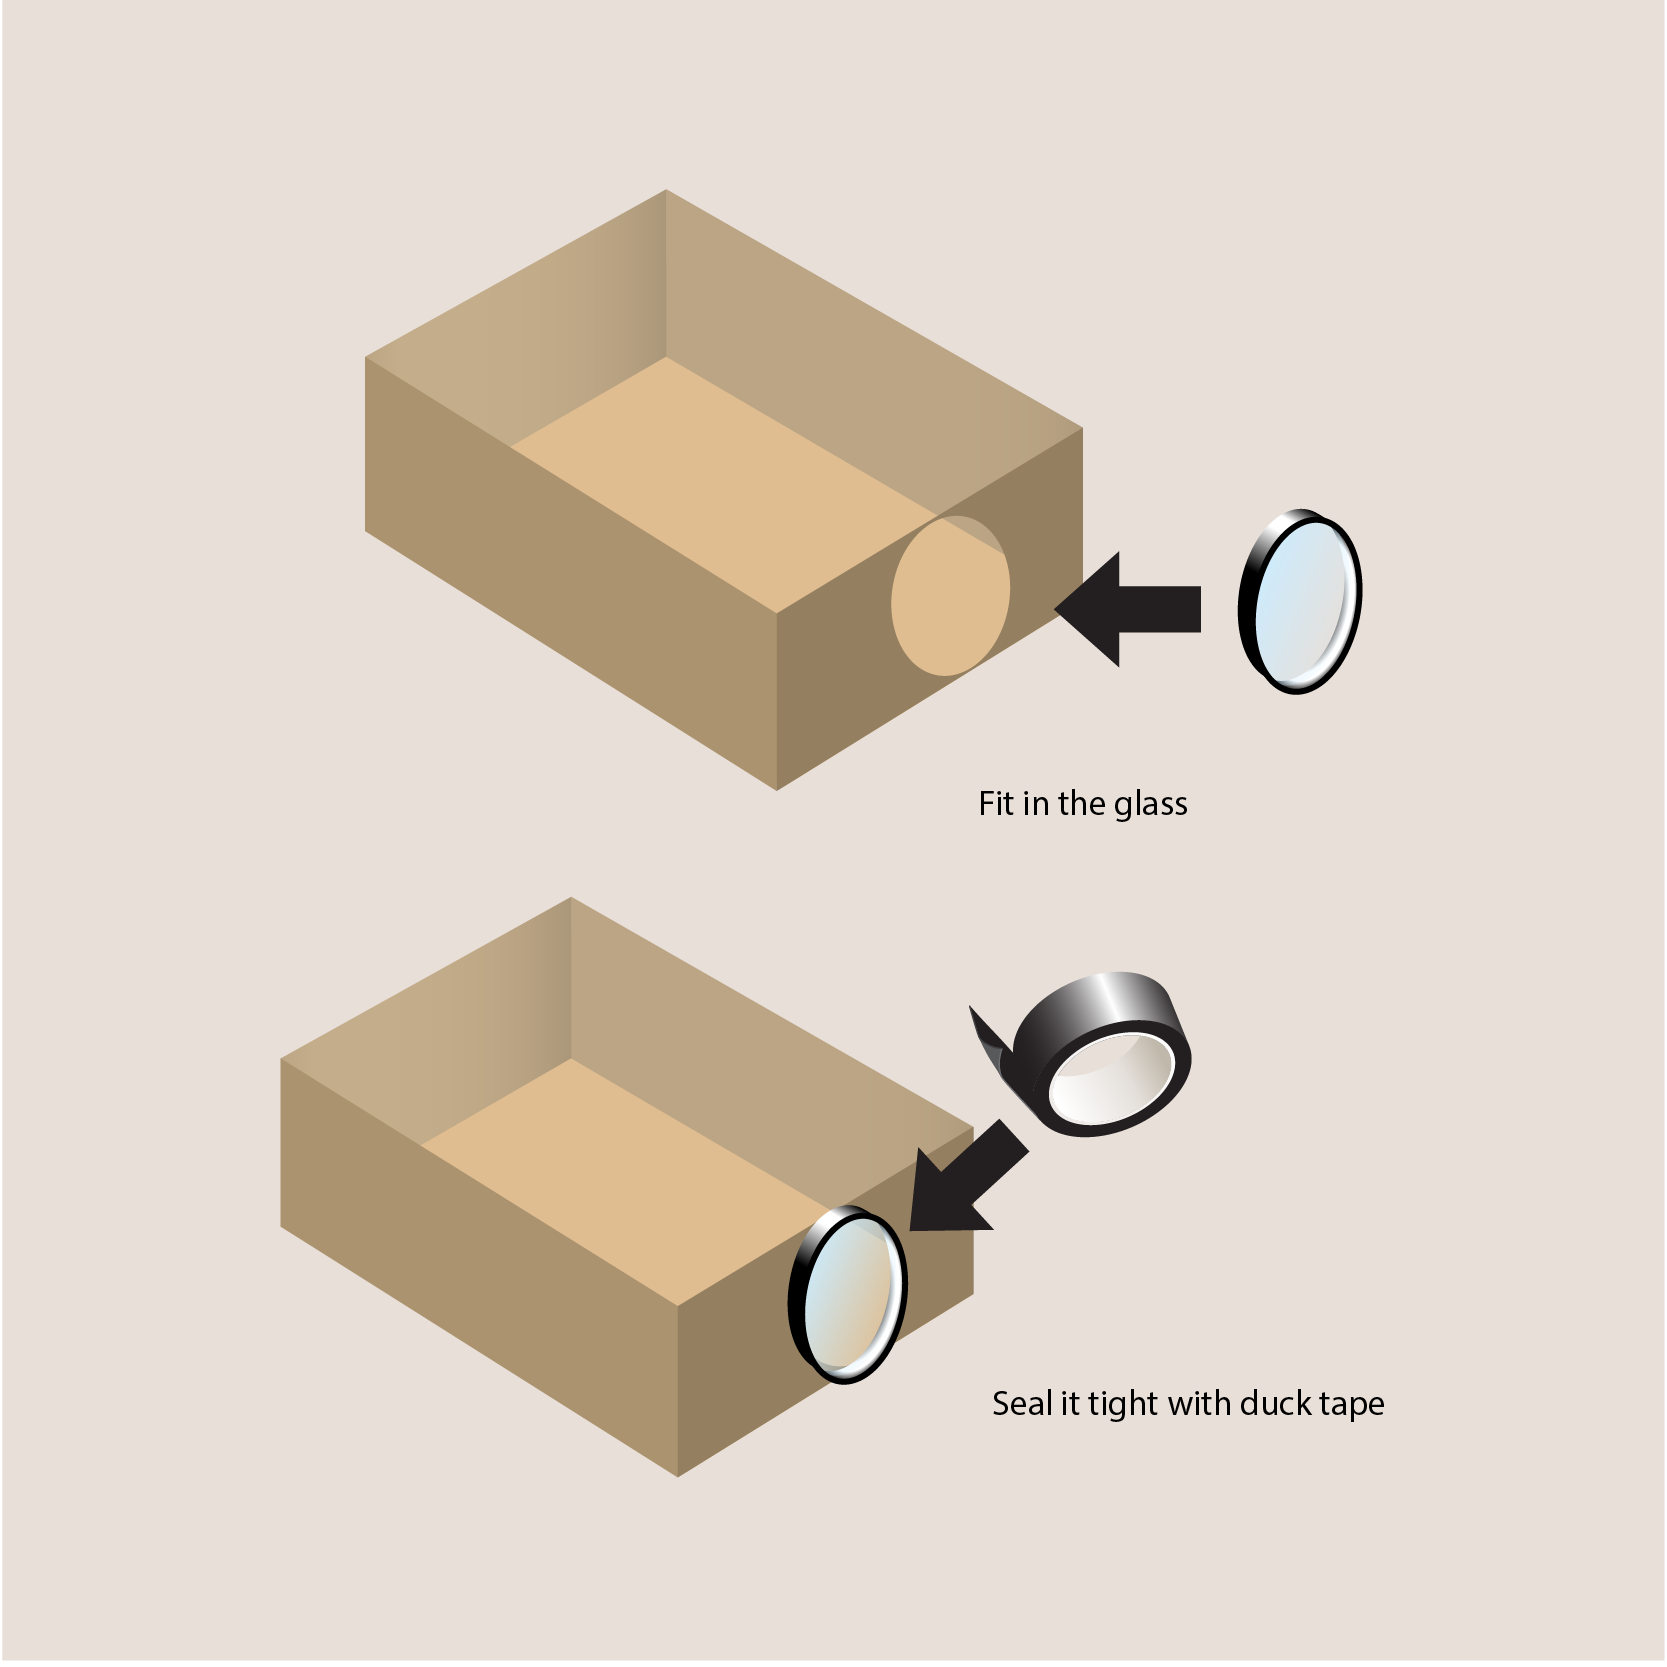
In the second part, take the glass and fit it in the hole that we make just now.
Seal it tight with duck tape and make sure no opening even the smallest one.
Don’t seal the glass with the box cap since we still need it to be functional as the cap.
3. Create the Phone Stand

In this part we will create a phone stand with paper clip. Please refer to the picture for the illustration.
First, carefully straighten the paper clip. You can use pliers and hammer to help you.
Second, flip the both end of the clip and leave a small portion in the middle straight.
Third, flip a bit part of the tip on both ends for the holder.
Fourth, pull up the middle part and make sure the stand is stable and strong enough to hold the phone.
4. Flip the Phone Screen Preview
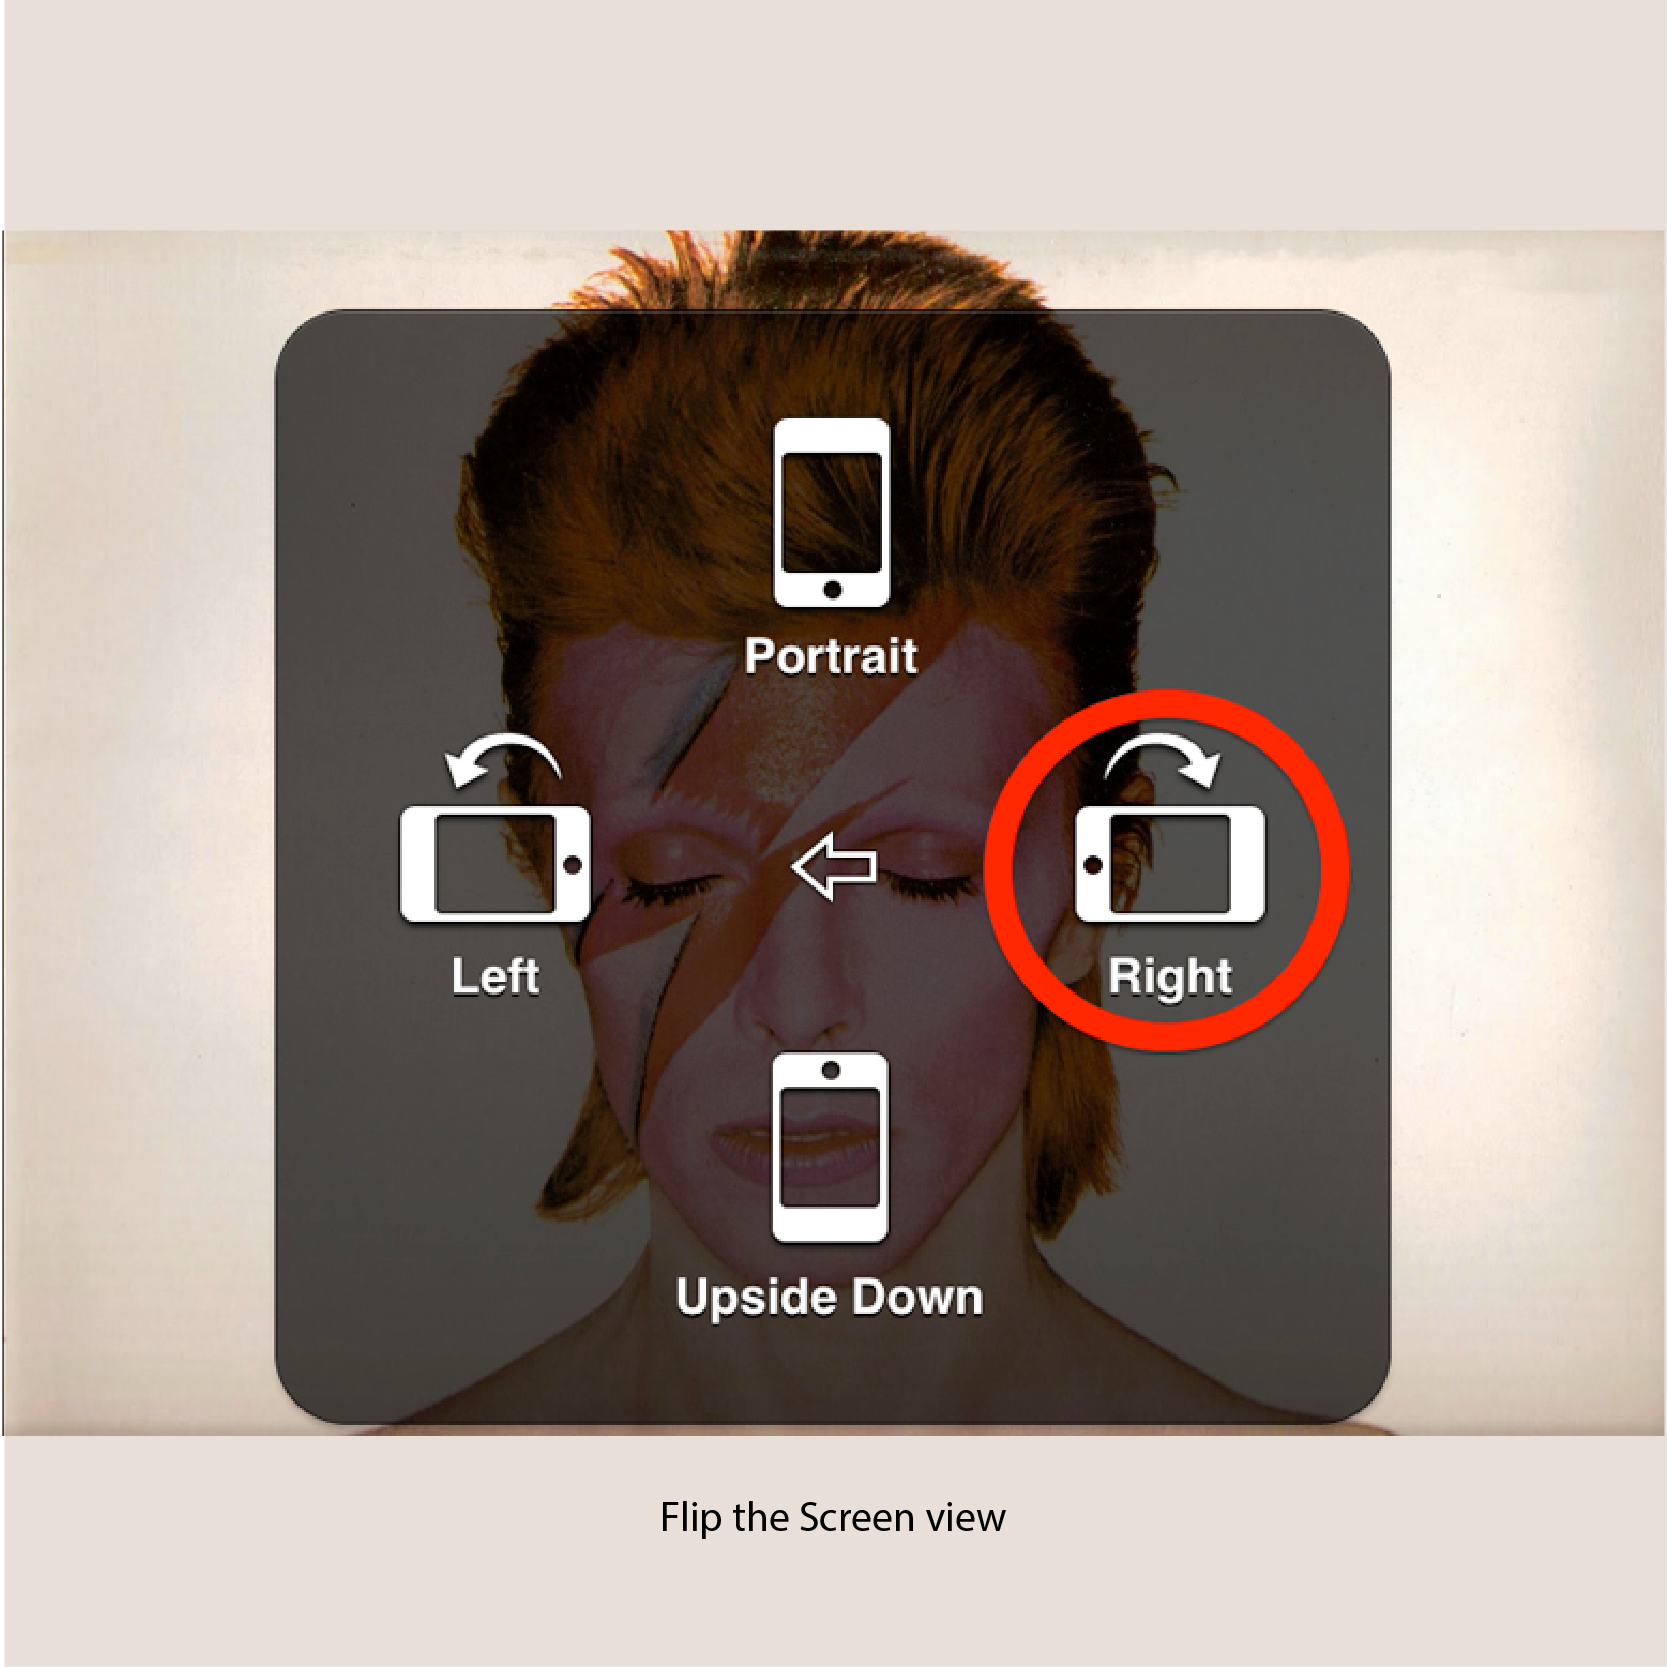
Since everything the projected through the lens will get flipped. We need to flip the phone screen preview in order for the projector to show a normal view.
For apple user, go to Setting > General > Accessibility and turn on AssistiveTouch. After activated, you will have white orb pops up on the screen that you can drag around. Then tap the orb, go to Device > Rotate Screen.
Like shown in the picture choose the Right option.
For android user, you can download Ultimate Rotation Control apps.
5. Adjust the Projector Focus

Since it’s a DIY product, you need to move the phone manually in the box to adjust the focus.
So after adjusting the flipping the screen option, put the phone with the stand in the box and adjust its distance with the lens until the projection that shown clear.
6. Finishing

For a better result, you need to put the brightness of your phone to maximum. But doing so will use a lot of battery power and you might want to plug the power cable.
For this, you can create a small opening on the back corner for the cable. Just make sure you seal it well with duck tape.
And for the last, close the box and enjoy your fruit of hard work.

Evaluation
On this part,we will check how is the Projector that you create works and some tips that might help you to solve the problems that happen.
As for the projection, the quality of the projector won’t be as much as the real projector and be reminded the resolution is depend on the screen and not the source files. To improve it, try to maxed out your phone brightness and make sure all the opening is completely shut and don’t forget to minimize the light source in the room as much as possible. It’s advised to choose a shoebox that has thicker material and black duck tape as discussed before. The quality of magnifying glass is also count in this project. The higher the magnifications the better, but it also come with the price so choose them wisely.
For the placement, make sure you put in on a stable flat surface and project it to clear white flat surface also. For focus don’t move the box but the phone instead, moving the box is purposed to make the projection bigger or smaller only. Keep in mind that the bigger the projection the lower the quality will be. Using power bank will also help for extra power supply to avoid another opening for power cable. Just make sure it placed in the back of the phone in the box so it won’t block the projection.
Conclusion
Congratulation, you now have your own portable projector device.
This projector is cheap, safe, handy, and not spoilt your phone. The quality of the product is really depend on materials that you used so spend more time on the execution, choose wisely and do it nicely. The process didn’t consume a lot of time and items so you can redo the work anytime you want to make it perfect.
As for the weak point, this projector really depends on the phone battery so you might find yourself plugging it with power cable or power bank. But keep in mind plugging the power while having it turned on will harm your phone so this product is not advised to use for long period of time.
Credits
Inspired by MattBothell project and Photojojo for the smart DIY
And also Mike Nathan on Hack A Day for his Mini Film Projector idea
Special Thanks to
Ms. Zahra Gebril,
and my fellow classmate on Knowledge Management class.
Teacher Page
The Webquest is created in purpose to complete the assignment for my study as MBA student. As for Knowledge Management we required to learn on how to store our ideas and experience for sharing and archiving purposes.
This is tutorial is the remake from other respected tutorial with some adjustment and tips and trick from personal experience on creating and using the product.
It is a fun project to make simple DIY for awesome result like this and many more of them outside there in the internet. Now almost everything is up so whenever you have a question don’t be shy, just ask internet. You’ll have your problem solved in the simplest and cheapest way.