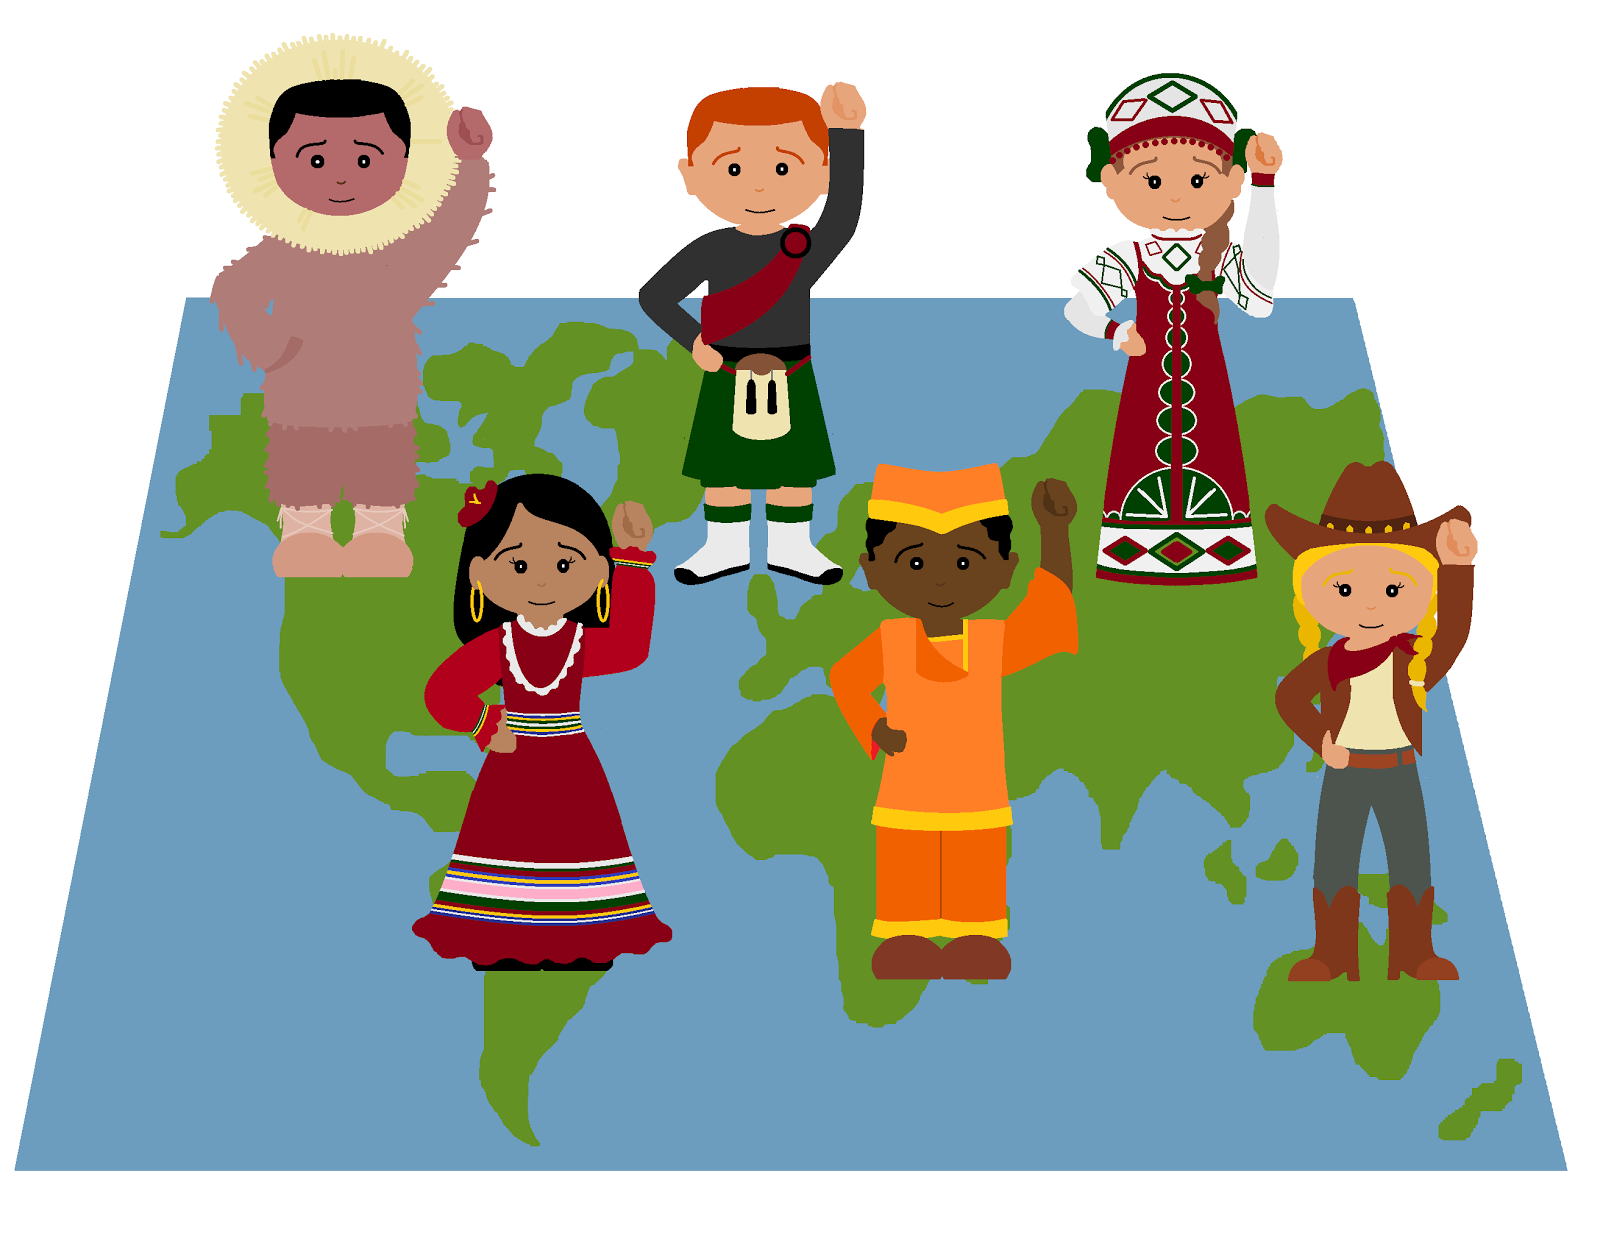
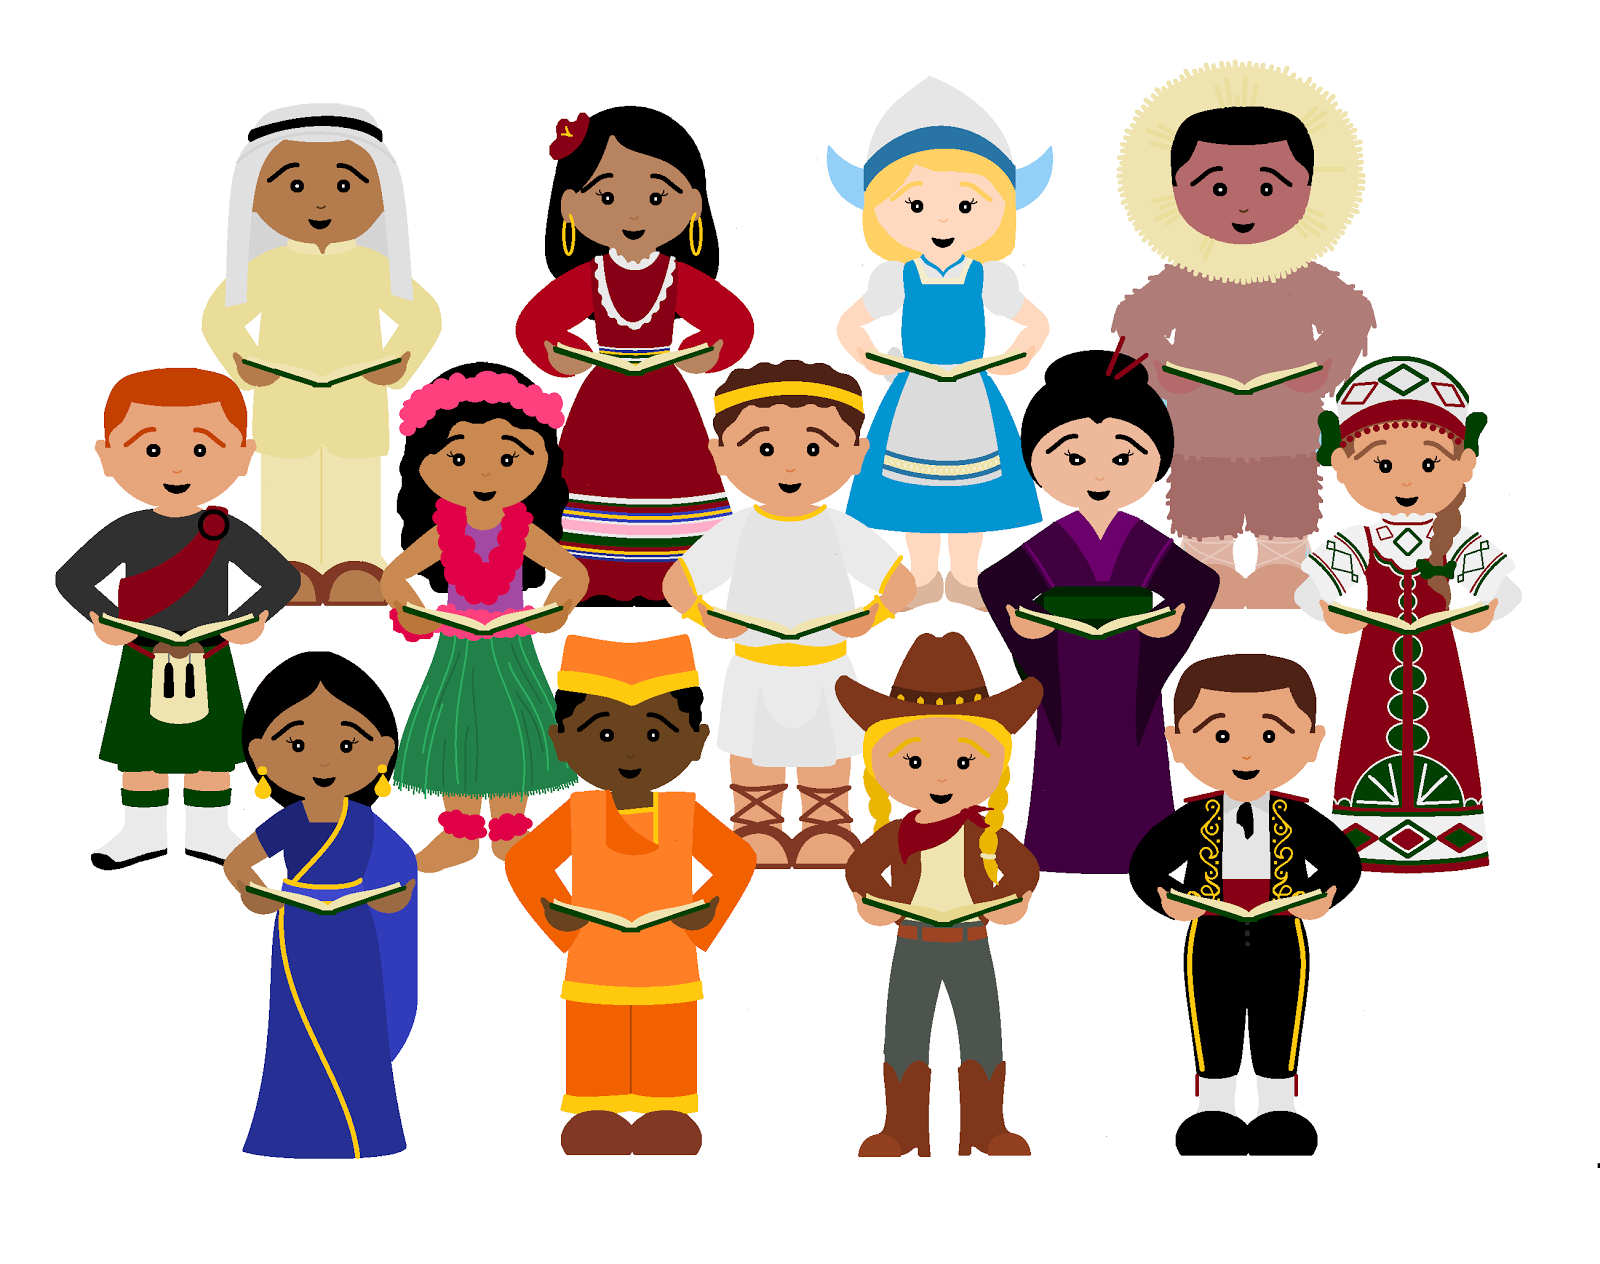
Introduction
Have you ever wondered if children in other countries are the same as you?
.png)
You are no longer an American Citizen, you have switched places with someone from a foriegn country, you both must learn as much about eachothers lives in order to not be discovered! Only the students who research the lives of these other children will be able to achieve this stealthy goal.
Will you be able maintain your cover?
Task
Since we have been learning about other countries in our class, you will use this assignment to better understand different cultures, and lifestyles in comparison to that of your own.
Your task is to:
- Use Microsoft Excel to create your average daily schedule.
- Choose a country from the list provided.
- Collaborate with other students that have chosen the same country as you.
- Research the country that your group chose.
- Jot down information that you think is important to understand the lifestyle and culture of that country.
- Follow the link provided and watch the video of your chosen country.
- Use Microsoft Excel to create an average daily schedule for the child in the country that you chose.
- Take a picture/have your parent or guardian take a picture of your house, what you had for dinner, the transportation you take to school, a typical outfit (boy and girl), and your favorite fun activity.
- Learn how to upload pictures from a digital camera/how to find images on google images
- Learn how to navigate different websites
- Learn how to Screen Shot
- Use your new screen shotting skills to find the same pictures of children in your chosen country. (There should be 12+pictures in total)
- Use the pictures and information you have collected to make a poster/collage that represents your chosen country and the child in that country, and a poster/collage that represents your daily life and your country.
- Present your posters/collages when they are finished.
By the end of the project, your group will:
- Demonstrate understanding of microsoft Excel
- Develop better collaboration abilties
- Gain better research abilities
- Demonstrate the importance of note-taking
- Gain the ability to upload and print off pictures
- Gain the ability to screen shot
- Demonstrate the ability to follow directions carefully
- Be able to explore websites in order to gain information or complete a task
- Demonstate the ability to organize your information visually and orally.
- Gain an understanding of other cultures and lifestyles.
- And have fun!
Process
Now it's time to break things down!
Ask yourselves:
Step 1: How do I begin comparing two things?
Step 2: Which Country am I interested in learning about?
- Honduras
- Malawi
- Indonesia
Step 3: How are we going to find information about these countries?
Step 4: How do I know what information is important to make note of?
Step 5: How do I gain a better understanding of a foreign life?
Step 6: How do I finish comparing two things?
Step 7: Does everyone in my group have a job to do?
- House
- Dinner
- Transportation
- Fun Activity
- Typical outfit (boy)
- Typical outfit (girl)
Step 8: How do we begin collecting pictures of other countries?
Step 9: How do we present the accumulated material to the class?
Step 10: How do I make sure I have sufficient knowledge about my country?
Step 1: How do I begin comparing two things?
This part of the project is individual, and will allow for you to really analyze your own life.
1. Open Microsoft Excel
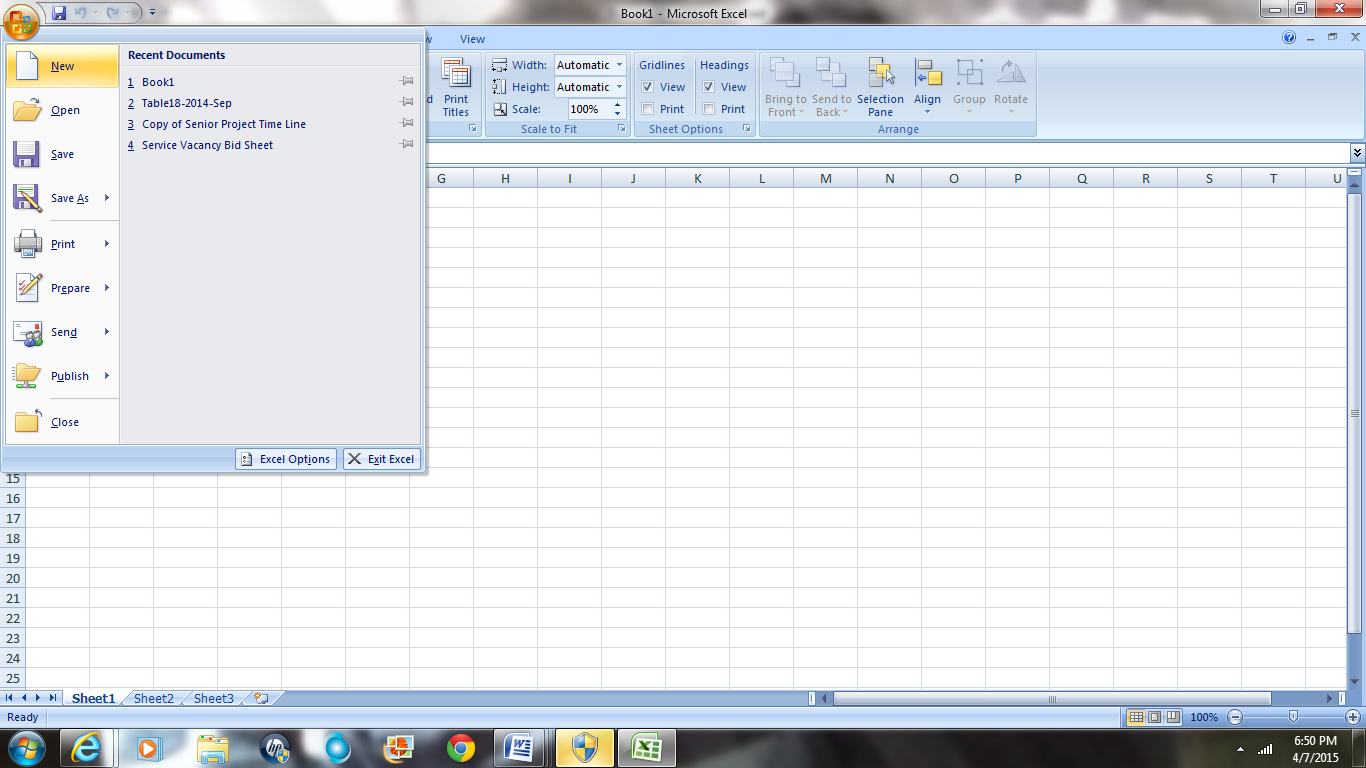
2. Click the "File" tab across the top, and then a new window will come open, and you will select "New" in the column on the left side
3. Click in the search bar, and type in "Blank daily calendar"
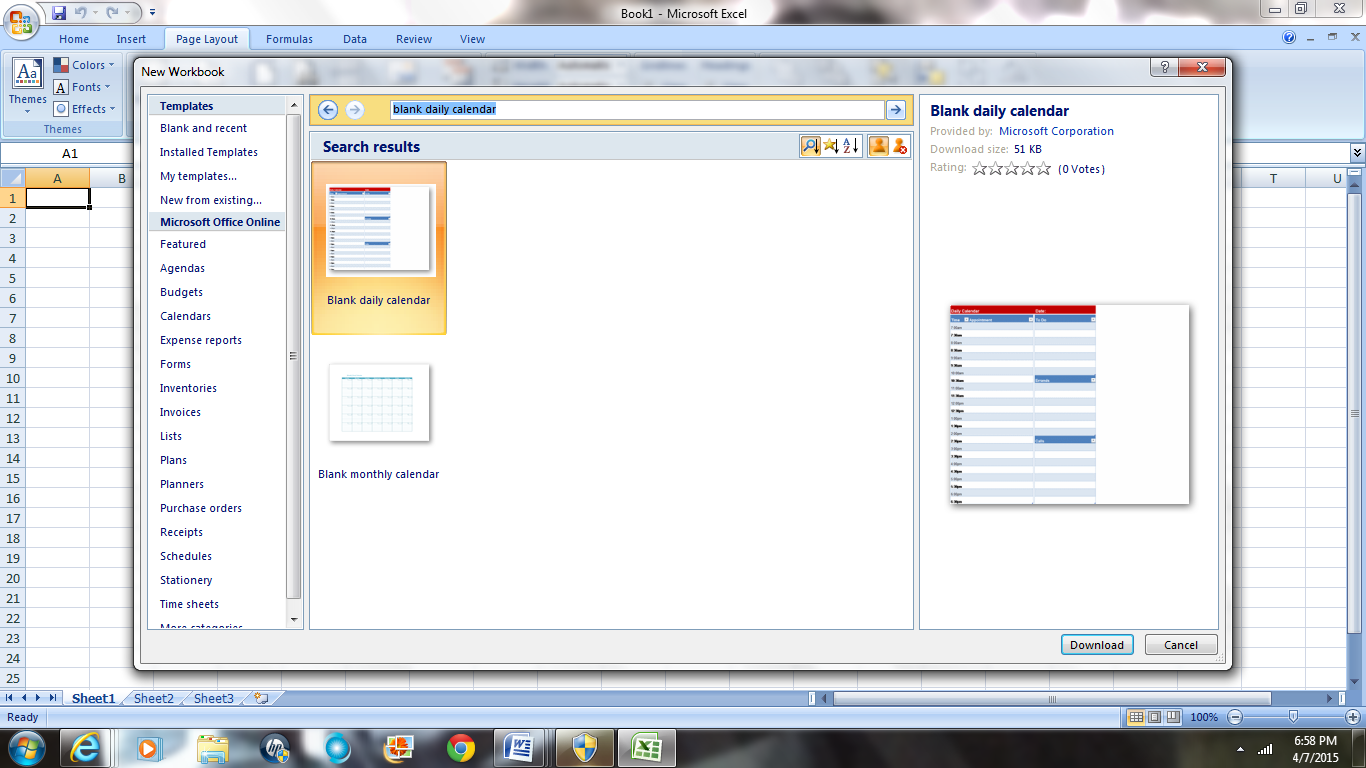
4. Double click on the first picture that says "Blank daily calendar"
5. Double click in the cell that says "Appointments" and delete this word
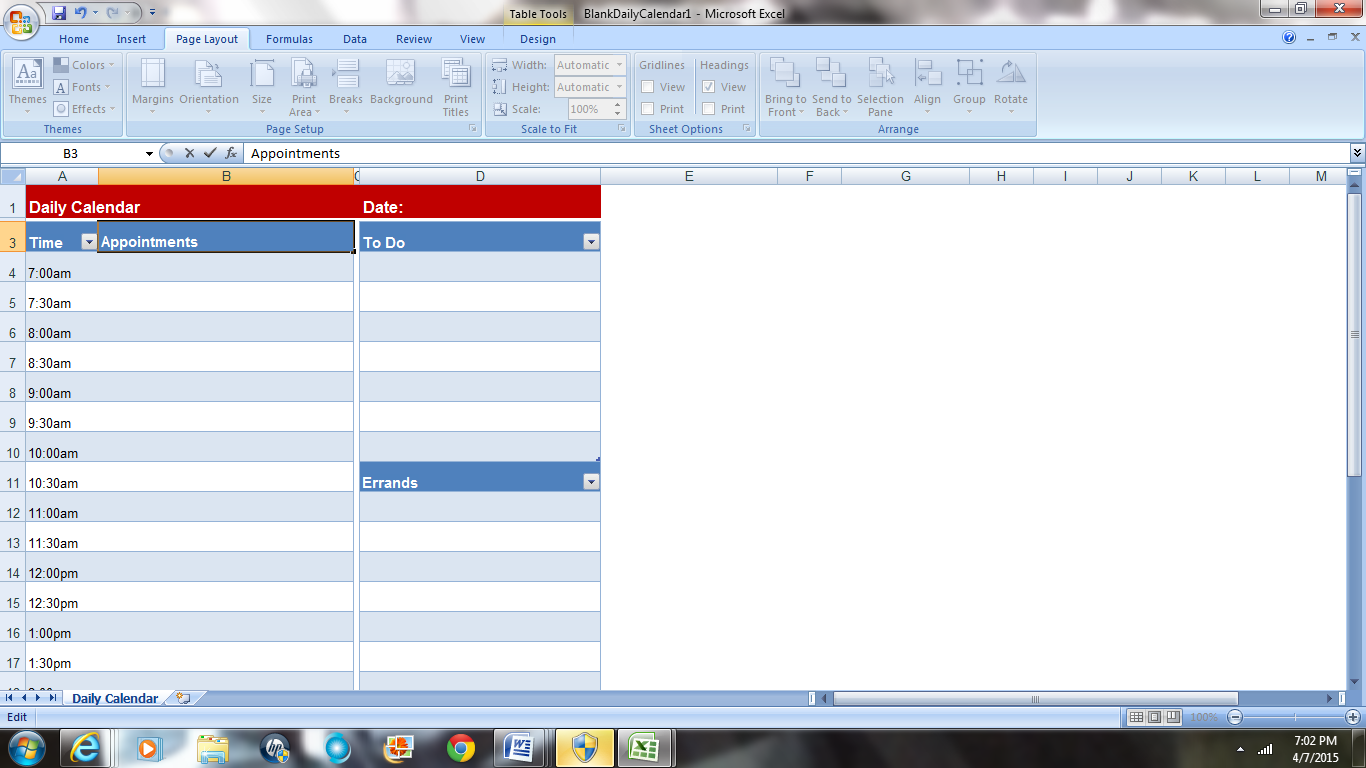
6. Type in "Activities"

7. Double click in the cell that says "To Do" and delete this word
8. Type in the word "Description"
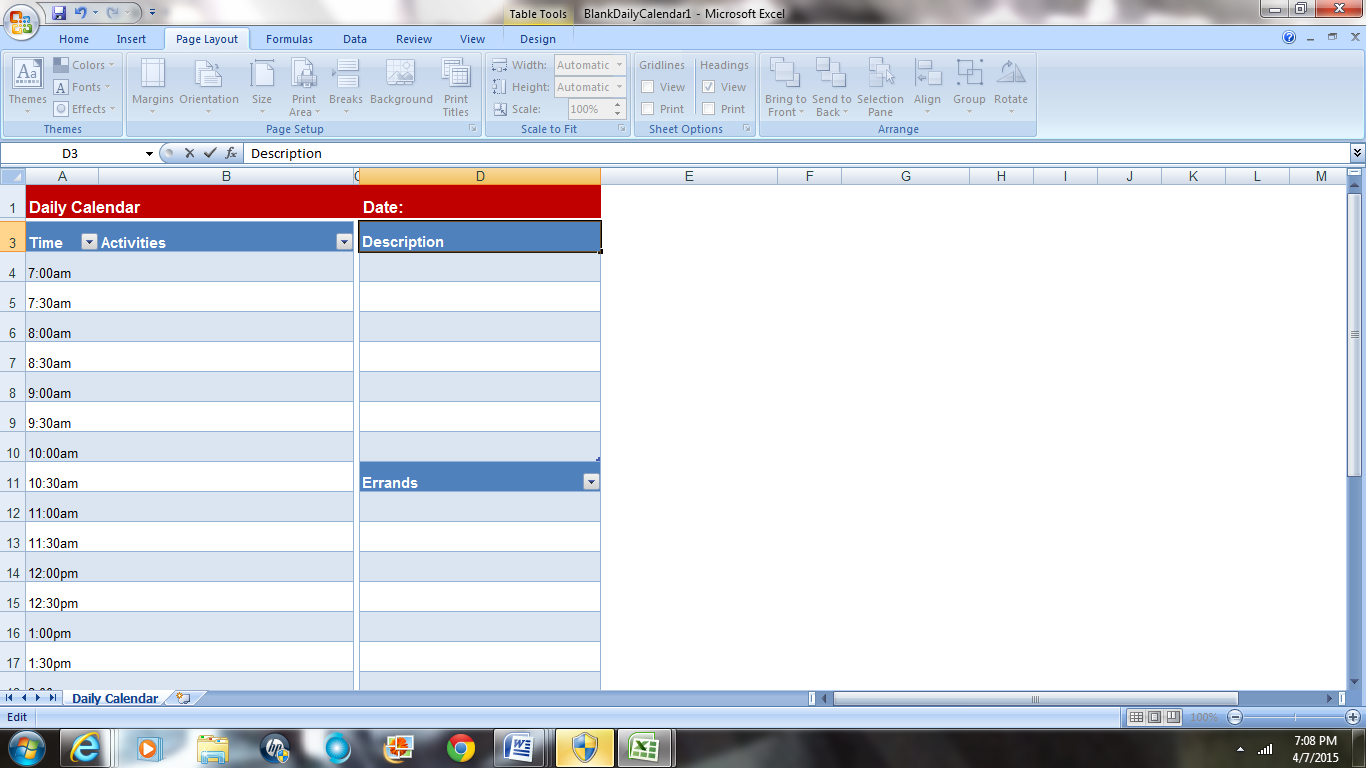
9. Double click in the second cell and delete the word "Errands"
10. Right click inside this dark blue cell
11. Click the little paint can
12. Select the white square in the top left corner
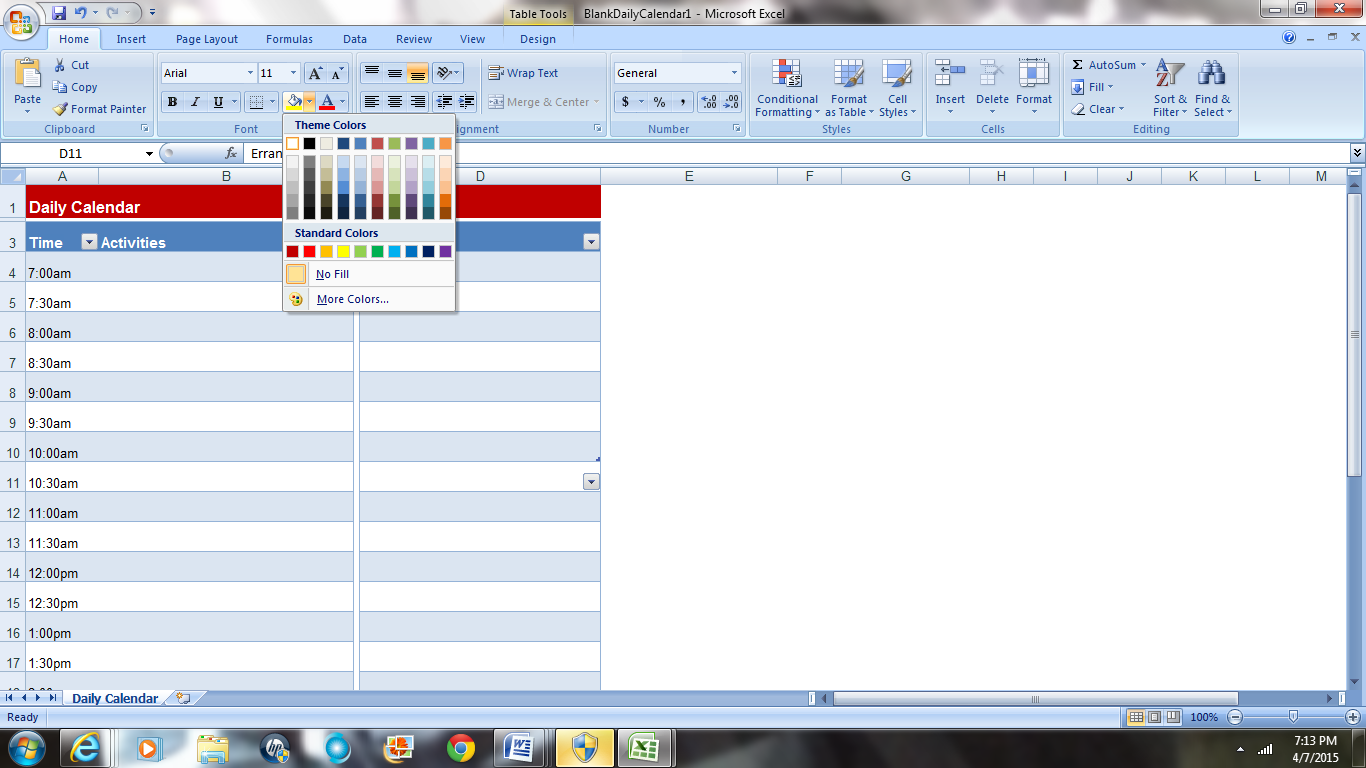
13. Click in the second dark blue cell and delete the word
14. Repeat 10-12
15. Scroll down to the bottom of the excel page
16. In the first column there is a little blue triangle in the right hand corner
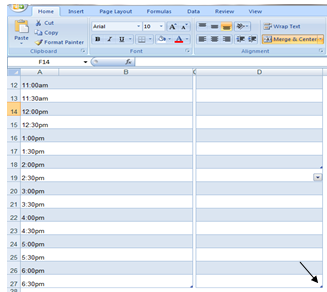
17. Hover your mouse over that corner until you see a double sided arrow appear
18. Once you see this arrow you will click and drag until you see 12 more rows appear, and then let go of your mouse (this should be until row 39)
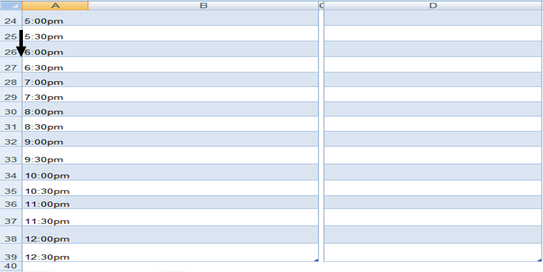
19. In these new spaces you will list the times 7:00pm, 7:30pm, 8:00pm. 8:30pm, 9:00pm, 9:30pm, 10:00pm, 10:30pm, 11:00pm, 11:30pm, and 12:00am (If you stay up passed midnight you will need to drag your column accordingly.)
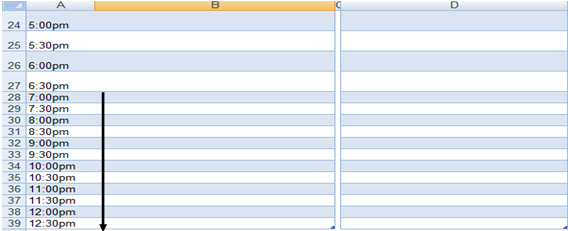
20. Now hover your mouse over the horizontal line between the numbers 28 and 29, when you see a bold arrow appear, click and drag your mouse slightly downward until the cell looks the same size as the cells above this...repeat until they all look the same.
21. There are times listed for your daily schedule, under the column labeled "Activies" you will write the task that you are doing in the adjacent cell that corresponds with the time listed. For example at 9:00 am, I would list "teaching math lesson".
22. Under the column labeled " Description" you will add more detail about the activity that you are doing. For example at 9:00 am, I would write "Teach my students a lesson on dividing fractions".
23. Once you are finished filling out the entire schedule, every cell should be filled.
24. Click on the "File" tab and select "Save As", you should save this document as "Name'sDailySchedule.the country you selected". For Example my document would be saved as "Mrs.Stuart'sDailySchedule.Indonesia"
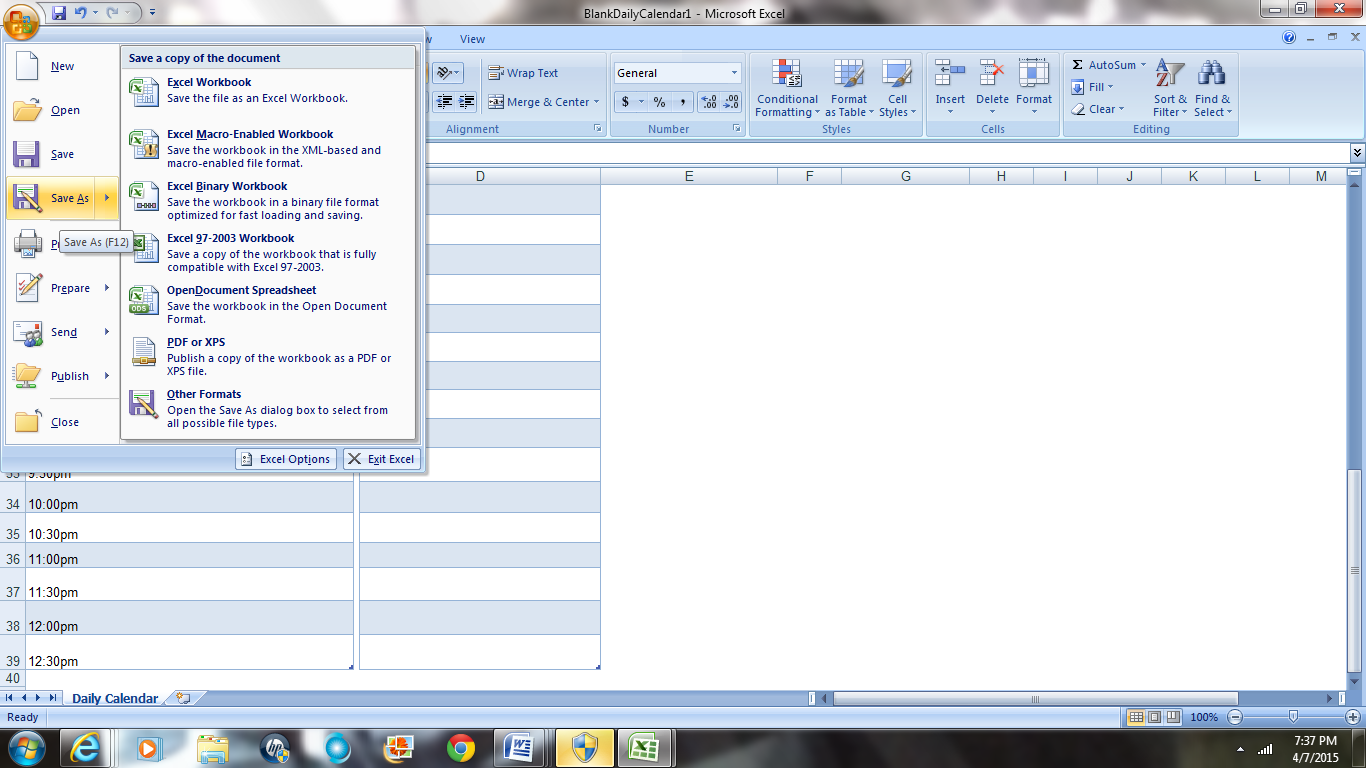
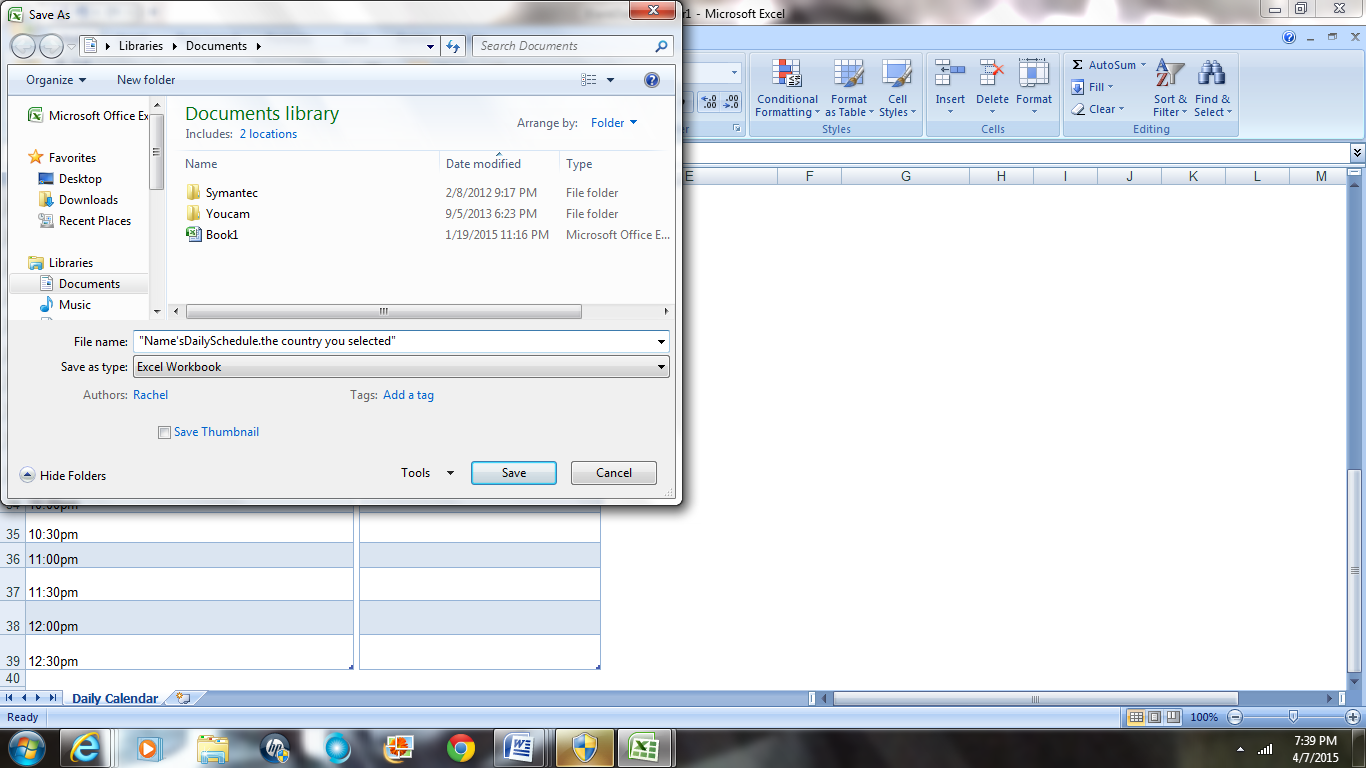
25. Step 24 is so that we can access this file when we get to another part of the assignment.
Step 2: Which country am I interested in learning about?
1. Choose one of the 3 countries (Malawi, Indonesia, or Honduras)
2. In order to choose your country think of which one sounds familiar, what do you already know about each one? Or you could even pick one you know nothing about, think about what you want to know about each country.
3. Once you have chosen ONE, I will place you in a group of other students who have chose the same country.
4. Have fun! Learning about Foreign countries is very interesting.
Step 3: How are we going to find information about these countries?
1. If you chose the country Honduras, follow this link.
2. If you chose the country Indonesia, follow this link.
3. If you chose the country Malawi, follow this link.
4. For gaining more information about the United states follow this link.
If you find that you do not have suffiecient information, it is encouraged that you conduct your own research.
Step 4: How do I know what information to make note of?
Note-taking is a very important part of being a student, from elementary school all the way to college, so it is imperative that you learn the skills necessary to differentiate between the important information you need to learn, and the information that doesn't have any use -- In order to do this, you must first think about what you have been assigned; this assignment is all about comparing yourself to another student, and our country, to their country. In the task, if you remember it was mentioned that you need to gain an understanding of other cultures and lifestyles, when looking through the links provided, you need to keep this goal in mind.
Look for words like:
Religion
Education
People
Economy (this means money, what is the average person like, poor? rich? in-between?)
These words will help you to identify aspects of their culture.
There will be bolded words that are larger than the other text, these words are titles, and the other text is called the body, you will look to first read the titles before each paragraph in order to know if it is important to this project, or should not be read, or made note of.
For this step you will need a notebook page, and pencil, you will write down the things that you think is important to understanding the lifestyle and culture of each country, it is important to not write down too much information that is unorganized/irrelevant, or too little so that your project is lacking information.
Step 5: How do I gain a better understanding of a foreign life?
Now that you have information about your country on paper, this step will allow you to gain a better, more visual understanding about the kids/culture in your country, this step will also help you to complete step 6 and step 8, so pay close attention.
If you chose Malawi follow this link.
If you chose Indonesia follow this link.
If you chose Honduras follow this link.
It is encouraged that you add information from the video to your notes.
Step 6: How do I finish comparing 2 things?
Remeber the Microsoft Excel sheet that we made? Well, now you are going to make another sheet just like that one, but with the child from your foreign country's daily schedule. It won't be exact, but try to get in all of the different activities you see them doing throughout the progress of the video. For assistance refer back to Step 1.
Step 7: Does everyone in my group have a job to do?
For this step your group is going to use some type of camera to take pictures of all these things. For example, if I was assigned to "house", I would take a picture of my house with a camera. If you are unable to do this/don't want to do this, you can do the alternative of finding pictures of these things pertaining to America on google images. For example, if I didn't want to/couldn't take a picture of my house I would go to google, and click on the "images" tab and type in "American Homes", and choose one that I thought fit the average American home.
1. House
2. Dinner
3. Transportation
4. Fun Activity
5. Typical outfit (boy)
6. Typical outfit (girl)
If you have chosen to take your own pictures follow this link to find out how to upload pictures onto your computer.
If you have chosen to find your pictures on google images follow this link (video).
Step 8: How do I begin collecting pictures of other countries?
In order to find photos of your requirements we will try a new technique called screen shot to capture your photos!
1. Go to your video from step 5
2. Select an image from one of your requirements, Ex. Dinner; when you find your image press the pause button.

3. Press the ctrl button at the bottom left side of your keyboard and the prt sc button at the top right corner of the keyboard at the same time
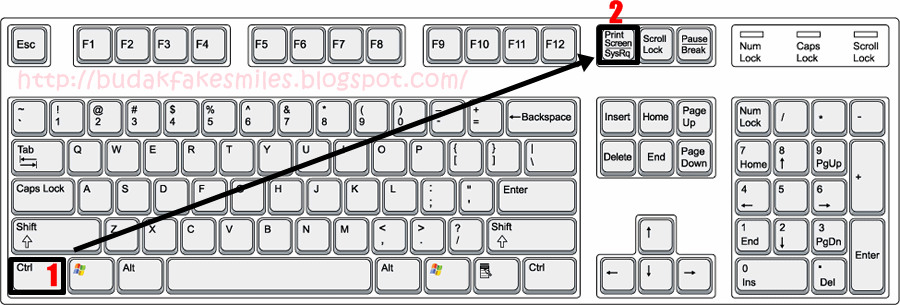
4. Now minimize your video window and launch Microsoft Word
5. Right click anywhere and choose the "paste" option
6. Now it's time to format your image; click on your image and the "Format" tab will appear along the top next to view, click on the "Format" tab.
7. Now select "Crop", this option is on the left hand side

8. Dark arrows and lines will appear along your image, you need to click and drag these arrows so that they fit around the image, and leave the rest of the webpage in the unhighlighted area.

9. Once you have finished, click anywhere on your Word document, and the crop tool will disappear.
10. Now you need to click "File" and "Save as", title your image according to what it is, for example if I was screenshotting a picture of food from the video, I would title it "Dinner".
11. Complete these steps for all of your required pictures
12. Once all of your pictures have been collected you will need to print them off along with the images that you collected of yourselves/from google images.
13. If you have saved your images onto your computer, follow this link to find out how to print them.
14. If you have saved your images on microsoft word, simply open the document and click "file" and then "print" and then "print" again (make sure that your images are the sizes that you want them to be before printing, you can change the sizes by clicking the picture and then dragging the corners accordingly).
Step 9: How do we present the accumulated material to the class?
Now it's time to let your creatifity shine! You've learned all of this interesting information about your country and the child in that country, now it's time to share that with your classmates! You are going to collaborate with your group to present all of the knowledge you have gathered about the country you chose, the child in that country, and your lives in comparison to that of theirs. Keep in mind your classmates have not conducted the research that you have, and we are all very eager to learn, so your job is to provide us with a good amount of information.
1. All of your required pictures should be printed off by this step.
2. Your presentation will consist of two posters or collages, it needs to be attractive and eye catching, but most importantly represent both you and your group members on one, and the child in the foreign country that you chose on the other. For example you could use the colors of that country's flag to decorate your presentation, and/or the colors of the American flag to decorate the other presentation. Be creative! The sky is the limit.
3. You will also need to access and print off both of the Daily Schedules that you made in Microsoft Excel (remember "file", "print", "print"). You will use these to write your script and compare and contrast both countries.
4. Be sure that everyone in your group has a turn to speak!
Step 10: How do I make sure I have sufficient knowledge about my country?
Well now that you have a creative presentation made, how are you going to talk about it in front of your class? You will need to put some information (this is all about balance, you want to use key words or phrases to help you remember what you want to say, not the entirety of your notes) on the presentation about the child and about the country, and also about yourselves and America on the other poster. These key pieces of information will help you to remember what you want to say in front of the class. Part of this presentation is about your opinion and about reflecting on the project. The other part is recalling the information from the websites that you explored and from the videos that you watched, so make sure that you reviewed each carfefully before presenting in front of your class.
In order to complete this step successfully you will need to organize the information that you gained from the video and from the websites according to the order you are going to talk about it in your presentation, it may help to develop a script before hand so you will be less likely to forget what you would like to say.
Make sure that during presentation you not only focus on each country seperately (both the country you chose and the United States) but also focus on comparing and contrasting each one. That's the whole point of this WebQuest!
Have fun with this part of the project, you have a lot of creative freedom both when creating the poster/collage and when presenting it.
Evaluation
|
|
Beginning(1) |
Developing(2) |
Accomplished(3) |
Total Points:18 |
|
Research and Information Fluency |
Information is not complete. The student is not working to his/her potential. It is evident that little research has been conducted. |
Some research has been conducted. Not all information has been gathered, the assignment has good start, but doesn’t seem completely finished. |
All research has been conducted successfully. Information was successfully gathered, and present in their presentation of the poster/collage. |
|
|
Communication and Collaboration |
Student did not show evidence of knowledge when presenting his/her poster/collage.
Student did not participate effectively in his/her group |
Student only knew partial information from his/her topic; had to rely on their poster/collage for speaking assistance.
Student participated minimally in his/her group, only making small contributions when asked. |
Student maintained eye contact with the class, and only used their poster/collage for some assistance. It is evident that thorough research was conducted.
Student participated effectively and involved their group members. |
|
|
Critical Thinking, Problem Solving and Decision Making |
Student didn’t grasp the concept of comparing, and did not form an opinion or perspective on the subject.
Student used one resource to collect their data.
Student did not gain an understanding of life in other cultures. |
Student started the comparison process, but did not seem to grasp the meaning behind it.
Student used few resources to collect their data.
Student gained partial knowledge of life in other cultures. |
Student collected and analyzed data in order to make informed comparisons, and adopted diverse perspectives.
Student used multiple resources to collect their data.
Student gained an understanding of life in other cultures. |
|
|
Creativity and Innovation |
Student did not seem to care about their posters/collages, or did not complete it.
The posters/collages were haphazard, and little color was used.
Little to no information and photos were displayed. |
Student demonstrated little care for their posters/collages.
Some colors were used.
Some information and photos were displayed, but they appeared not to be finished. |
Student demonstrated pride for their posters/collages.
Bright and attractive colors were used.
Information from their research, 12 or more photos from their life and the other student’s life were fully displayed on each poster/collage. |
|
Conclusion
Great job! You have just finished learning about another country and maybe even a little more about yourself. I hope that by completing this project you have gained a better understanding of what life is like in other countries, and are more aware of the world that you live in, not just your community. If you learned enough about your assigned country you should have been able to live in this foregin country unnoticed!
In completing this project you: worked as a team, created a poster/collage of your findings, used Microsoft Excel, gained a better understanding of how to make note of important information, retain that information, and display the information visually.
Reflection:
Lastly, in a 1 page essay reflect on what you learned (with a focus on the differences and similarities between you and the foreign child), any opinions that you had on the information/videos, anything that stood out to you, what assumptions you had about other countries before completing this project, which were right, and which were wrong?, and any other information that you would like to reflect on.
The End
(United States - English)
Mathero a Zokambirana Zathu
(Malawi - Chichewa)
Selesa
(Indonesia - Indonesian)
El Fin
(Honduras - Spanish)
Credits
We give permission for others to use and modify our WebQuest for educational purposes. The purpose of this WebQuest is for every student to have access to resources to learn about other cultures and their way of living. Each student has the right to use this WebQuest; it is our hope that students gain additional knowledge along with completing the given task.
Teacher Page
Grade level: 5th and 6th
Subject: Social Studies
Group size: 18 students
Prior Knowledge: To complete this WebQuest students must know:
- Proper computer safety knowledge
- How to find adequate resources
- A general understanding of how computers work
- How to properly collaborate in a group of other students
- How to properly conduct a presentation
- How to carefully follow directions provided
- How to compose a proper essay